Do you want to change the PHP settings for your cPanel-hosted website? Making a php.ini file is one method to accomplish this. You can adjust different PHP configurations with this file to better fit the needs of your website. We’ll walk you through the cPanel php.ini file creation process in this guide.
About Php.ini.
PHP uses the php.ini file as a configuration file to alter its behavior during runtime. It has directives that regulate several PHP features, including module settings, resource limitations, and error reporting. Since PHP reads this file every time it launches, you can change settings without changing PHP’s core files.
About cPanel
cPanel is the Linux-based control panel utilized to significantly manage your web hosting. It operates similarly to desktop applications. Also, with cPanel, you can perform actions from a user-friendly dashboard instead of operating complex commands.
Why create a Php.ini file in cPanel?
Creating a php.ini file serves several important purposes:
1. Personalization
Default PHP configurations that cPanel frequently offers might not be suitable for your particular needs. You can alter PHP settings to suit the requirements of your website or application by generating a php.ini file.
2. Override Server Defaults
Every website hosted on a cPanel server is subject to the global php.ini file that is exclusive to those hosts. You can override these global settings for any directory or domain by creating a php.ini file.
3. Troubleshooting
Restrictive server settings can occasionally cause some PHP capabilities to not function as intended. You can troubleshoot similar issues by changing cPanel PHP configurations by creating a php.ini file.
4. Security
You can add more security measures to protect your website from possible attackers by making a php.ini file. This entails turning off risky PHP functions, imposing more stringent file upload limitations, and turning on tools like open_basedir to prevent file system access.
5. Compatibility
Certain PHP apps or frameworks could have suggestions or requirements that are unique. By customizing PHP settings per the instructions of your chosen program, you may make sure it works with your system by creating a php.ini file.
Steps to create php.ini file in cPanel
1. Log in to cPanel: Access your cPanel account using your credentials.

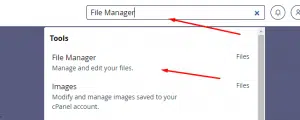
2. Locate the “File Manager”: In the cPanel dashboard, navigate to the “Files” section and click on “File Manager.”

3. Choose the Directory: Select the directory where you want to create the php.ini file. It’s usually the root directory of your website (often named “public_html”), but it can vary depending on your setup.

4. Click “New File”: Look for an option like “New File” or “File” at the top of the File Manager interface and click on it.

5. Name the File: In the prompt that appears, enter php.ini as the file name.
Congrats! You’ve successfully created a php.ini file in cPanel
Summing Up
Therefore, updating to the latest version of PHP is essential to resolving compatibility issues and improving the functionality of your website. To modify your PHP version within cPanel, you can easily create ini file in cPanel by following the above-mentioned steps.
Frequently Asked Questions
Q 1: What is a PHP ini file?
Ans: PHP uses a configuration file called the PHP ini file, sometimes known as the “PHP initialization” file, to manage different runtime parameters. It has directives governing memory limitations, file upload sizes, error reporting levels, and other aspects of PHP behavior.
Q 2: How to add PHP.ini on cPanel?
Ans: To include a PHP.ini in cPanel, do the following:
- Open your cPanel account and log in.
- Open the “File Manager” application.
- Find the directory (such as “public_html”) where the PHP ini file is to be added.
- Select “File” or “New File” by clicking on it.
- “php.ini” is the file’s name.
- To add your preferred PHP options, edit the file.
- Save the modifications.
Q 3: Is PHP ini necessary?
Ans: Indeed, the PHP ini file is required to adjust PHP settings to your website’s or application’s specifications. It lets you tweak a lot of different parameters, improve security, speed up operations, and fix problems with PHP features.
Q 4: Where is the PHP ini file in cPanel?
Ans: The PHP ini file’s position within cPanel could change based on how the server is configured. But normally, you may find it in your website’s root directory (like “public_html”). The “File Manager” feature in cPanel can be used to create or change the php.ini file by navigating to this directory.
Q 5: How do I edit the PHP ini file?
Ans: To edit the PHP ini file in cPanel, follow these steps:
- Log in to your cPanel account.
- Access the “File Manager” tool.
- Navigate to the directory where the php.ini file is located.
- Right-click on the php.ini file and select the “Edit” option.
- Make the necessary changes to the file using the built-in text editor.
- Save the changes.
Q 6: What is ini set in PHP?
Ans: A PHP configuration directive’s value can be dynamically altered during runtime using the ini_set() function in PHP.
Q 7: How to increase file size in PHP ini?
Ans: Find the php.ini file, edit the upload_max_filesize directive to the desired size (e.g., “20M” for 20 megabytes), save the file, then restart the web server to increase the maximum file value for uploads in PHP.
